Chevy Astro and GMC Safari Forum banner

Project: turn my work van into a camping van

49K views 54 replies 18 participants last post by  HotWire  
#1 ·
In two weeks I'll be leaving for a trip from Northwest Illinois to the Olympic Peninsula in Washington, then down the coast into Oregon and maybe Northern Cali, then home again. I've got 3 to 4 weeks to make the trip and will probably drive over 4,500 miles. Lots of sights to see on the trip, and I will be staying in the Astro every night.

So this thread is about a quick, low budget conversion from working van to camping van. I'm trying to plan it so the changes I make will keep the van functional for work when I return, and so in the future I can be ready to go camping anytime just by repacking.

Here is the list of things I'm working on and hope to accomplish before leaving:

Obviously I need a bed. In the past I've thrown an air mattress on the floor but now I want something comfortable, big enough for two, and convertible into seating space.

I need a roof vent with a fan. I've slept in the van before and it gets hot with no ventilation.

Also for good ventilation I need to put screens on the tip-out windows and mosquito netting for the rear hatch and maybe the sliding door.

An easy to set up awning for the side of the van.

I need to add a pushbutton inside the rear hatch to be able to open it from inside.

I'll be adding a house power system to power led lighting and the vent fan. Also an inverter to keep the laptop charged. I'll be carrying a Honda super-quiet generator to run a microwave and whatever else I may think of. The Honda can also charge the house battery so I may avoid having to do a charging line and battery isolator.

The headache wall is coming out for the trip and I plan to make a swivel base for the passenger seat so it can turn to face the rear.

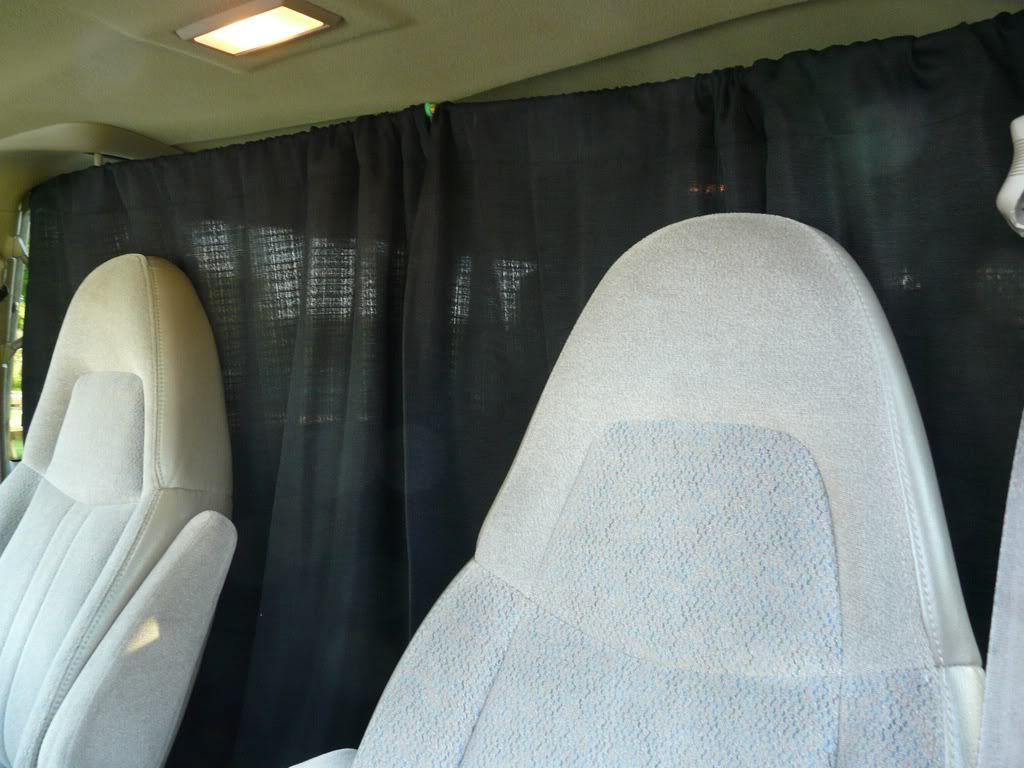
I'll need privacy curtains and a way to block the rear hatch window. Side windows are already blacked out. I expect to be doing some stealth camping en route.

I've got some of the work done but it's been too hot to work on it for too long. With two weeks left I've got a lot to get done. As I pick away at my list I'll take pics and post progress.
 
#2 ·
Here's the beginning work on the bed. The shelves are staying in the van but I decided to relocate the tool chest and do away with its shelf. This way I end up with a bed that's a full 48" wide.

Here's a before pic (with the van unusually clean); this was taken before installation of the headache wall.
Image


This is getting ready for building the bed.
Image


Here is a fitting of the rear part of the bed. Tool chest is relocated to the rear floor and bolted down. I moved up the lowest shelf to bed height and attached a steel angle to support it. The right side is a wood support. The bed platform is 3/4 inch BC sanded plywood; it's less than $20 a sheet and is really smooth and flat. Across the rear I bolted a piece of 1 1/2" angle for reinforcement.
Image


The bed will be in two pieces; the front section will slide up on top of the rear forming a bench. I think the rear platform will work out in the future as it actually increases the amount of storage space in the van. And it's easy to lift up for access to underneath. I'm giving up some large item loading space for work but I don't think it will bother me and I can always throw stuff on the roof racks.

I hope to finish the bed tomorrow.
 
#3 ·
Here's my progress on the roof vent. I could have purchased a vent kit but they all stick up to high; I need something low profile that won't interfere with loading stuff on the roof racks.

I came across this battery camping fan at Walmart. It's 12 volt and it only draws about 1/2 amp; for 12 bucks I bought one and started to figure out how to build my roof vent.

Image


A lot of head scratching on how to make a water and wind proof vent opening, I came up with this:

Lay out the opening in the roof. This is smaller than the fan but I wanted to keep out of the ribs in the roof. Drilled a couple pilot holes from inside to locate the layout.
Image


Cut out the opening with the trusty 6 inch cut off tool. This was a painful moment. :)
Image


After cleaning up the cut edges I masked things off and painted to protect the cut metal edges.
Image


I framed the cut-out roof piece with 1/2 x 3/4 aluminum, bedded it in adhesive caulk and riveted it together.
Image


Same operation on the roof. This angle is held in smaller so the lid will fit over the top of this, forming a flash/counterflash (roofing term :) )
Image


I added a piece of stainless continuous hinge at the front for the lid.
Image


I added some sticky back tubular neoprene weatherstrip to the lid. The edge of the angle on the roof will bear at the center of this.
Image


The lid mounted to the hinge with rivets. When closed the height of the finished lid is less than 3/4" above the roof of the van.
Image


The inside of the finished vent opening. I finished up by caulking all the joints and seams.
Image


I'd like to figure out a way to trim out the edges on top but I think once its painted to match the van it will look fine. When standing next to the van you can't even see it.

Here's the fan in a wood frame ready to mount to the roof. This goes in tomorrow, then I put together an operator to open and close the vent from inside the van.
Image


I did a quick test holding the fan in place with bungees and wired it; It works great, moves a lot of air. And in a torrential rainstorm today it was absolutely watertight. :clap:
 
#4 ·
Very nice, You are a real craftsman. I have found it easier to just erect a mosquito net inside the van, as opposed to screening all the windows.
http://www.targus.com/us/productdetail.aspx?sku=apm69us This is the car laptop charger I use and it works great. Never had luck with an inverter, but they may have improved these days. I bought a solar panel for @ 100 bucks that would fully charge a dead battery in an hour. Should fit under your ladder racks if you wanted to keep it mounted.
 
#5 ·
Kenny, that is looking really, really good. That vent looks pro and is lower-profile - and therefore the normal human would never know it's up there.

And I can attest to the fact that fan will move a TON of air, silently. We have 2 in the ancient RV and I love them for when we're not running the AC.
 
#6 ·
Very cool vent , looks very pro , perhaps if you use a piece of plexiglass you could have a overhead skylight to let sunlight/moonlight into the van to save from using battery power for lighting.

what type of arrangement is going to be used for the morning shower?
 
#9 ·
Thanks for all the great comments! :D

perhaps if you use a piece of plexiglass you could have a overhead skylight to let sunlight/moonlight into the van to save from using battery power for lighting
I thought about using plexi or polycarb for the vent but it didn't really work with my plan, I was afraid of it eventually cracking. At least I get some light when its open.

I have found it easier to just erect a mosquito net inside the van
I scored a really cool mosquito net; a friend brought it back from Indonesia, it's a huge thing designed to hang from the ceiling over a full bed.
It's big enough to tent over my bed, or cover a door, or drape over the tailgate.

This is the car laptop charger I use and it works great. Never had luck with an inverter,
The laptop is the only thing that will be powered by the inverter. I've got a little 100 watt job that should handle it fine.

I bought a solar panel for @ 100 bucks that would fully charge a dead battery in an hour.
I would love to do a solar system, but for now I'm on an extreme budget so I'm going to keep it as simple as possible.
 
#10 ·
Pretty good progress this weekend.

I took out the partition wall. I've got some carpet scrap so I can patch the floor with a carpet seamer.
Image


I had to relocate the subwoofer and amp which was mounted to the wall behind the passenger seat. I would have put the amp under the drivers seat but it it has a really noisy fan.
Image


The bed is finished. It's a full 48" wide at the head/rear and about 45" by the sliding door. For a mattress I got a 2" memory foam pad on Ebay for $10. It feels really comfortable.
Image

Image


The front part of the bed slides back to make a bench.
Image


A 2x4 laid flat reinforces the center of the bed and supports the front section. Dowel pins in the 2x4 fit in holes in the front section to hold it in position. I'm using 1/2" conduit for legs at the very front.
Image


I got the fan and frame mounted to the ceiling. I need to start on wiring the "house" 12V system.
I'm thinking it would be a good idea to put some insulation on the ceiling; the dark color roof gets really hot.
Image


This crusty old thing is going to be the basis for my passenger seat swivel. I bought a bunch of steel so I can start fabbing this up.
Image
 
#11 ·
The dutch door tailgate doesn't have any way to open from the inside so I had to make one. I got a momentary pushbutton switch at Radio Shack for $4.

I pulled the plastic trim off the hatch and found a good clear space for the switch just above the pull handle. Here the switch mounts to the plastic trim, then the escutcheon for the handle hides the switch mounting so only the button shows through. The wood shim was to stiffen flex in the plastic.
Image


Here I pre-wired the switch with pigtails. The switch is an spdt momentary because I need a NO and a NC contact.
Image


Here's the switch wired in; if you find an orange wire anywhere in the van it's always hot. I cut the red wire to the hatch actuator, the wire to the actuator goes to the switch common, and the other cut red wire to the NC contact, the NO contact goes to the orange "hot" wire.
Image


Everything soldered and taped up, I dressed the wires and mounted the switch, replacing the plastic trim.
Image


Here it is all put together. I'm tickled to death with this little mod, it cost a total of $4 and took all of an hour, and it works great. :dance:
Image
 
#13 ·
To sleep in mine I cut screens to fit the front windows and secure them with magnetic strips so they pop on & off. You can get cheap screens designed for garage doors from harriet carter or miles kimbal and cut it in half. It will then fit the back door opening and the sliding door opening, Very airy in summer.
 
#14 ·
To sleep in mine I cut screens to fit the front windows and secure them with magnetic strips so they pop on & off.
I'd love to see a picture of how you did this. What is the magnet material and how did you secure it to the screen?

Today I started on the swivel for the passenger seat.
Image


Here's the top and bottom pieces tacked up ready for welding.
Image


And here are the finished pieces after welding and grinding and after a coat of primer.
Image


I'll be using a piece of 6" pipe between this top and bottom piece to cover the bearing and give it a clean look. Tomorrow I'll fab up the release mechanism, then weld the swivel into the seat frame.
 
#15 ·
Looks great Kenny :thumbup:
 
#16 ·
I haven't got as much done as I'd like, yesterday it started raining and by this morning we had over 14 inches of rain.
This is right next to my house, fortunately my place is high and dry but I did leave a window open on the Astro. :doh:
Image


I got the latch mechanism done, no pic but it's a simple spring loaded bar that engages the two swivel sections.

Here the lower part of the swivel is welded to the seat frame, then I cut the frame in half so I could fit the upper section.
Image


Then I tack-welded the seat frame back together and put a couple welds on the upper swivel. I'll end up cutting away a lot of the metal between the upper and lower part of the seat frame. The black lines on the frame were made at the start of the project by projecting a straight edge from the load floor of the van so I could establish a level line for the swivel.
Image

The weather looks good tomorrow so hopefully I will have the seat swinging. :banana:
 
#17 ·
Today I finally got my seat swiveling. :D I've still got some metal finishing to do on the frame but the hard part is done.

Also today I scored a loaner deep-cycle battery for the trip. Tomorrow I'll pick up the generator and inverter from my son so this weekend I can do the "house" wiring in the van.
Just a few more things to do and it's time to start packing. I leave in 7 days. :driving:
 
#18 ·
Awesome work! Can't wait for more pics. I used stick-on velcro and black cardboard on my trip to darken the windows. I carried a 5 gallon jug with a hand pump, worked well for drinking, washing etc.
I just duct-taped a mosquito screen to the sliding door window and the opposite one, was good enough for me.
Image
 
#19 ·
Oh and this is what I did to get some privacy. Bungee cord with some velcro in the middle, attached to the headliner and the clothes hook/sliding door metal piece. Black wal mart drapes.

Image
 
#20 ·
I just duct-taped a mosquito screen to the sliding door window and the opposite one, was good enough for me.
I haven't had time to tackle the screens, I have the material so one of my first stops I will do the same, cut pieces of screen and tape it to the window frame.
I also got a black walmart curtain :thumbup: , it's 50 x 84 so it's big enough to cover both front windows and the windshield; I also got an expanding rod so I can hang it behind the seats for stealth camping.
 
#21 ·
I had some finish work to do to the seat frame. I welded in metal to fill where I cut the frame apart, then lots of grinding and sanding.
Image


Finally got some paint on it. It's not a great match but it will do.
Image


And installing the new seat frame. I could have spent more time on finishing and a good paint match, but it's not for show and I was getting tired of working on it. :D
Image


I had some interference with the back tails of the frame hitting the seat belt, so I had to go back and do a little trimming. It looks fine and now swings freely in a full circle. :dance:
 
#23 ·
Nice job ! , how do you lock it in place after you get position you want?
I didn't take any pics of it, but there is a piece of pipe/tubing welded to the upper frame; inside the tube is a steel bar with a spring behind it that locks down into a hole in the lower frame. In the last pic you can kind of see the release mechanism, there's a rod from the top of the locking bolt thru a hole in the frame and an actuator lever to lift the bolt to release it.
 
#24 ·
Well the van is as done as it's going to get, I'm leaving first thing tomorrow. I'm pretty happy with the whole project. I've got some organizing to do on my pack so I'll be sorting things out on the road.

In the back of the van I have a 2000 watt generator, just in front of the gennie is the battery box with a deep cycle battery. I skipped the whole battery isolator system as I don't want to be charging the battery in a closed van; I'll use the gennie and a battery charger to top up the charge as needed. Also have 100 + 25 feet of power cord just in case, and a ton of bungees.
Image


Along with plenty of tools I've got a road kit with a spare serp belt, a jug of oil, coolant, and tranny fluid; some brake fluid, an oil filter ( I plan to be changing oil somewhere along the way), and cans of WD, PB blaster, etc.
Image


I insulated the ceiling with 3/4" foam cut to fit between the roof ribs. It makes a drastic difference with the temps inside the van!
I got the "house" wiring done; the exhaust fan, some led lighting, and the quad box on the shelves is plugged into a small inverter for laptop charging, etc. On the top shelf is the battery charger.
Image


The view from the back. I got a neat little folding table that's a good height and it stores nicely under the bed along with folding chairs, etc.
Image


With the seat spun around it feels really roomy.
Image


Here's the bed pulled out. The 2" memory foam is quite comfy; it has a velour cover that I haven't put on yet.
Image


Even with the bed pulled out I've got some room to move around and get in and out of the sliding door.
Image


And last but not least, the Loo!
Image


That's it for now. I'll probably be updating this as I travel and get things better set up. Also be posting some camping shots of the Astro.
:driving:
 
#25 ·
I've been out for eight days now, traveled 2800 miles already. The van is running perfect. I got some bad gas in Eastern Washington so I think I'll change the fuel filter when I do an oil change when I get to Eugene.

The van setup is beyond what I hoped for; It's so completely self-contained that I'm able to stop anywhere, anytime for a night. I'm still trying to figure out the pack so the transition from overnight to travel is easier. I also brought way too much stuff, but I've used almost everything at some point. I haven't set up the awning yet, haven't needed it, the weather has been spectacular. I had to buy a better inverter to handle what I was doing, a 500 watter was $39 at Home Depot in Aberdeen. Also had to buy a new camera; the lesson is don't put the camera in your back pocket and sit in the sand at the beach.

Right now I'm in the Olympic Peninsula at Forks, Washington. Here's a pic from a few days ago at Mt St Helens:
SANY1477-640.jpg


Here's a video of the drive from Mt St Helens.

And here's a video from one of my camp sites.