Chevy Astro and GMC Safari Forum banner

Fuel tank removal today

11K views 39 replies 8 participants last post by  Canyonero  
#1 ·
Off to a rough start, tank bolts took forever to get out, lots of penetrating oil and torque, finally got both out from passenger side.
I forgot what I was under the van to do after a hitting my head on the transfer case.. I remembered when I hit my head on the leaf spring…

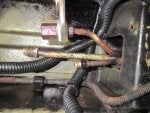
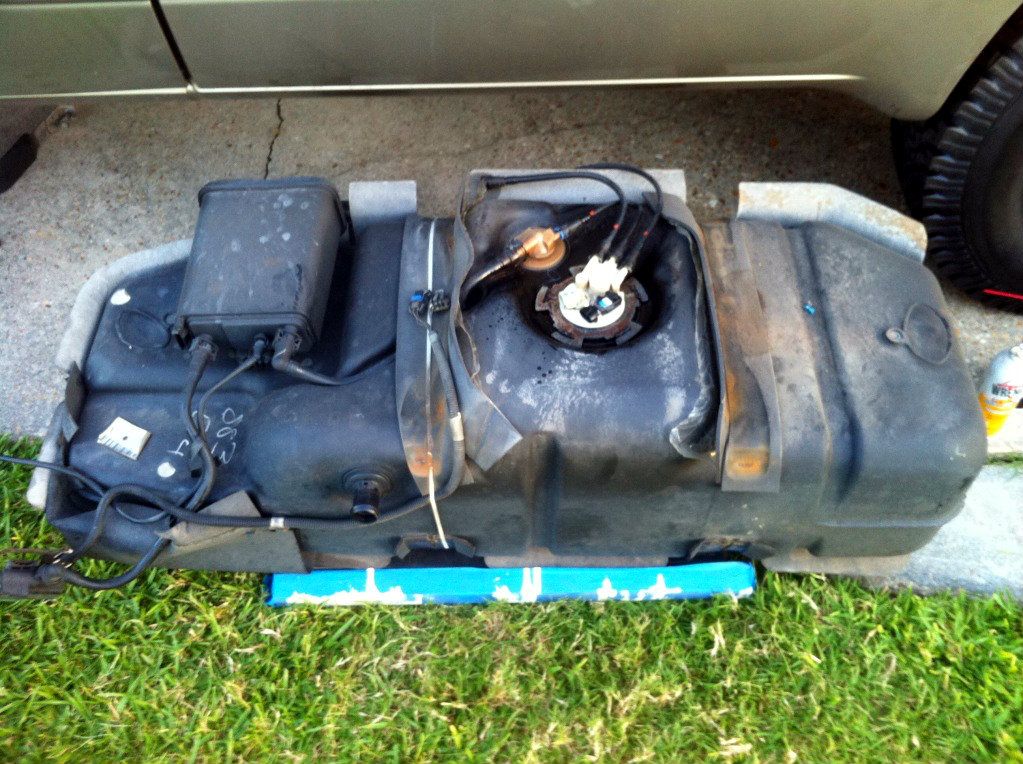
I do have the filler neck disconnected as well as the evap? ( Little black box near fuel filter ) and the wiring harness…
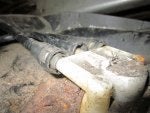
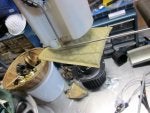
I'm unsure how to undo these fitting on the pump itself.. I bought fuel line disconnect tools, but it looks like there's no room for them in there! Are they pinch fittings?

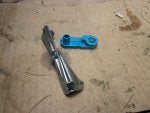
I'm definitely planning to cut a hole in the floor when my tank is removed later… I'm dropping the tank today just to replace the part that sends to the fuel gauge, and to replace the rear lines so I can get a new fuel filter on.
If and when I need a new pump, I'd rather not go through all this again!
Also, what's this black box on top of the fuel tank? I wasn't expecting it, since I've seen a number of diagrams and photos without one.

Thanks for helping !
 

Attachments

#2 ·
Finally got it…. with screwdrivers and offset needle nose pliers… Not fun fittings…
My new rear line set has flexible metal fittings…

Pulled the fuel pump, going to install the part that reads fuel level, hoping that's why my gauge never reads correctly, the old one does look worn.. Cleaned up the retainer ring which was very rusty…

Now to install the two rear lines.. hoping it goes a little smoother now.
 
#3 ·
Box is the evap canister vent. Should be mounted in the rail in front of the tank; this tells me someone's already dropped the tank and threw that up there when they did. Then forgot to put it back in place when they put it back up.
 
#4 ·
Thanks, I'll have to go check it again, I could of sworn it is mounted to my tank, seems like it belongs there…. You are referring to the large black box as seen on top of my tank?

Not a fun day, started at 11, still at it…. I have managed to get both rear lines removed, had to cut one from fuel filter, and then was able to remove filter from it's front line….

The upper line I got removed, but not without causing a leak of the forward side of the brass union… I guess I need to cut that line and install a new union? I think that'd be the return line, is it also a high pressure line? Maybe I can cut it and use some fuel injection hose?

My stone guard was rotted pretty much in half, no good to reuse or patch up…

What I did was use adhesive and roof rubber to cover the entire bottom of the tank. I think that'll protect well enough against dirt roads, and I don't go off roaring anyway, so not worried of blunt punctures.

Last step tonight will be cutting the floor. It's a 2 day project for me as usual due to rust and complications.

I've also found the part I ordered to replace, isn't the same, though it should be… Not sure why… I had a fuel pump put in by a local garage in 2006. Maybe because they didn't use ACdelco.
 

Attachments

#6 ·
Yeah, I just went out to check, it's mounted, it looks like the tank has a built in bracket.. I see that the earlier models were different…

I just cut off the brass union from the return line… will have to try to figure that out tomorrow.. I have the new rear line.. I suppose I can always connect my fuel line repair kit to the new line and run injection hose from it to the cut front line…

Will be glad when this one is done, most projects don't put my van out of commission for 2 days…
 
#7 ·
If it's the return line, it's not high pressure. I'd put on a new union, but I'm a little OCD (and my hubby does HVAC and has that sort of thing on his truck).

Shouldn't be an issue to use fuel-injection hose with fuel injection clamps - the solid band with the screw - to replace it. I might use a flaring kit to put a bubble near the end and put the clamp on the other side.
 
#8 ·
I'll pick up enough parts to keep my options open…

This is what I'd think could connect to the new rear line male fitting and allow a short rubber section to splice to the cut front line… ( I'd hate to cut off the threaded fitting on the new line if not needed, just need to adapt to hose )

Otherwise, a 5/16" compression fitting to old line, that has a female end to accept the new rear line…

Wish it was like my boat, a long rubber hose with a hand primer bulb. I keep a spare in the center console… :banghead:
 

Attachments

#9 ·
Can anyone tell me why my fuel pump/sending unit looks different than all the images I find when searching for 2002 Astro fuel pumps?

Like I said, a local garage put that in in 2006…. I bought the right part to fix the fuel gauge level sensor, but it doesn't fit this pump.. I wonder why they used this pump? It's been fine all this time and still works. I may put in a new one soon either way.
 
#13 ·
Yes, sorry, I just realize there's no picture of the pump yet on here….
I'll post it now…

The screen, sensor and wire connections seem different than the images of correct 2002 pumps… It's been running strong for years, so I'll leave it alone, although I'd like a working fuel gauge !

I have one of the ACdelco pump kits on order too, just to have on hand... I wonder if it'll even be compatible. It was $50 as opposed to the whole sending unit for $250 and up.

Thanks again for all your help and replies !
 

Attachments

#14 ·
yes, east coast.. NH…. rust is horrible. I try to stay ahead of it, but didn't always, so I do have some rusting on lower inner body behind rocker panels… I guess they'll need to be dealt with eventually somehow…
Luckily the frame and all structural parts are solid. I probably went through 5 cans of rust encapsulator this summer taking care of shackles, body and front end.
 
#15 ·
It's a Carter sending unit/pump assembly. To repair that, you need a Carter replacement part.

I'd get an AC Delco hanger assembly from a junkyard, put the new AC Delco pump and replacement sending unit into it and be done.

It has worked a long time for you - what, 8 years? However, if you put it back together and it dies next week, you're going to be pretty pissed about dropping the tank again.
 
#17 ·
Canyonero said:
I'm cutting a hole in the floor for sure… I'd rather not ever drop the tank again. Already drilled the pilot holes while I was under there….
It'll go back together for now, main concern has been bad fuel lines and a cogged filter. That should be resolved tomorrow.
You got your hands full with that rust - yuck. Reminds me of cars I owned while living in Minnesota.
I bought an aftermarket fuel pump (250.00) to replace the dead stock unit. You should also replace the O rings in the hose connections and some literature recommends replacing the terminals. I also replaced the relay; It cost less than 10 bucks. Since I'm at well over 200,000 miles, any part is fair game.
My fuel gauge began acting weird a few months after installing the replacement pump so I replaced the pump under its lifetime warranty. Using the hole I cut in the floor I had the pumps swapped in less than 45 minutes and no more fuel gauge antics. Some posters here installed really slick hatches over the hole. I was on the side of the road with no power and frozen fingers so I trimmed a piece of roof flashing with a fat bead of caulk on the edges and sheet metal screws
While training as an archaeologist I had to study the physics and chemistry of rust. Auto manufacturers know how to build vehicles that don't rust but the public has not demanded this.
My evap cannister is in the same location as yours.
 
#18 ·
Yup, that's an AC Delco /Delphi fuel gauge sending unit. You'd be surprised at what happens to the pump brushes/contacts in those fuel pump modules. Put some good gas into the tank every once in a while to get the "lubrication package" that comes with some of the gas brands that advertise all the special stuff like "invigorate". You pay a higher premium for it, but the fuel pump will last longer getting some lubrication through that pump every once in a while.
 
#19 ·
All done and running again… that was a long weekend project… The compression fitting on the old line worked well , and I went with injection hose on the return to the union connecting to my new rear line. Cut everything back beyond rust, they look good closer to the engine. Everything's cleaned and reassembled and running.
I should have taken a photo of my fix for the fuel sensor, I ended up soldering a piece of copper wire to what was left of the old brush. Seems to be working, for the first time in years... Maybe I'll know how much gas I have from now on. I'll probably still get a new sender to house my new ACdelco pump motor. Could use a new lock ring too, it's pretty rusted up.

The hole in the floor came out fine, went 9x15 and used some strapping with self tapping screws to reattach. I'll either use caulking or more roof rubber/adhesive, to seal the perimeter. Also discovered a small rust through near the middle bench forward right mount.

While under there, I took out my bad E-brake cable and installed the new one, with adjuster and connector. Got my bracket drilled and remounted to adjust for the 2" lift too.

While my lines looked pretty nasty, overall no major rust… it's the lines that the manufacturers should either plastic coat, or use stainless.

Now I have to figure out this " ting" noise I hear on bumps… Maybe it's the 3/8 elbow that disappeared in my frame rail while lifting, or maybe something more serious…
 

Attachments

#21 ·
It was nice in NH all weekend, I was under the van too much. I figure it's better to miss a nice day and get this work done now, then have to do anything at all on the van in the winter…

I think I'm going to recarpet the rear now that I've pulled out the factory carpet… I have a big melted area where an aside battery spilled one time.
Never did get the bucket seat mounted.. while the tank was out would have been the time, maybe I'll just stay with the rear bench…
 
#22 ·
Unless you have a heated garage up there, get it all done now. When I still lived in CT, I took my cars to my local garage in winter for oil changes (I only did oil changes and plugs-wires-cap-rotor back then). We had a garage, but it wasn't heated. Never fun laying in slush that might or might not melt as you worked.

I assume you treated your rust spot with the carpet out, right? I'd put down a moisture barrier, then new padding, then either the factory carpet (just for fitment) or marine carpeting on top of that. But I'm not good with carpet stuff, so to be honest I'd go to the junkyard and find a better factory piece, then pressure-wash and line dry, then install.
 
#23 ·
yeah, I had a water pump go in February once and did the job in the driveway, not fun. Heater core burst once about Dec, not as cold, but not fun either way.

I'll probably go with marine carpet right on top of the factory. I want to coat the metal floor with rust encapsulator when I get time this week. I'll weld of screw in a plate where I noticed a little rust through.
 
#24 ·
One last question, for anyone reading…. The rear brake line that runs on the body to the rear differential equalizer, is that a part I can buy? Or would I need to make a new line? It looks pretty horrible, I may get myself some line, tools and fittings to have on hand for when, or if it fails.